Change Photoshop's Splash Screen
On a Mac most Adobe CC apps splash screens can be changed by editing the proper .jpg that resides inside the Resources folder of the app. For instance to edit Illustrator's splash the.jpg path is:
Illustrator.app/Contents/Resources/
Search for "splash" inside this Resources folder. There are some .jpg with the word splash in their file names. What image the app will show on the splash depends on screen resolution, licensing status, etc. But you can quickview the .jpg to find out which one your Adobe app displays, then edit that one. Piece of cake!
Photoshop
Photoshop is a different story, a tool called PSCCIcon is needed to change the splash. That's because the splash for Photoshop is packed.
So you need to extract the contents of this file, edit the .jpg, repack it and then overwrite the original. Sounds complicated but is not.
If you are on Windows machine, you can skip the steps below and use the tool using the CMD prompt.
OS X Requirements
This is a Windows tool so the easiest way to run the .exe on the Mac is by using a wine wrapper.
The PSCCIcon zip contains 3 versions of the tool that can handle most Creative Cloud and CC file versions.
Requirements:
Wineskin: http://wineskin.urgesoftware.com/tiki-index.php?page=Downloads
PSCCIcon: psccicon.zip
Extras:
Some Templates: templates.zip
OSX App ICNS: psicon.icns
Create the Wrapper Wine App
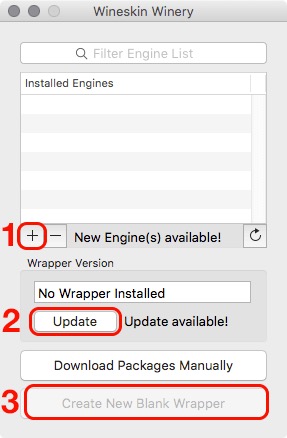
Open Wineskin and do this:
Click on the
+icon to install a new engine. Install the latest.When that's done click on the button
Updateto install the wrapper.Now click on the
Create New Blank Wrapperbutton and type a name for the app and clickOk.Once it is done select
Show Wrapper in Finderand move the .app to your desktop.
5\. You can close Wineskin now.
Copy PSCCIcon to the Wrapper
- Extract the PSCCIcon.zip file. You'll get a PSCCIcon folder with some files in it.
- Now open the app you've just moved to the desktop and click on the
Install Softwarebutton. - Click on
Move a Folder Insideand select the PSCCIcon folder and clickSelect - On the Choose Executable window type or paste Program Files/PSCCIcon/init.bat
Configuring the Wrapper App
Click on
Advancecheck the box Use Start.exeNow click on
Browseand select the icns icon for the app.

Close the configuration window.
The Final App

Extracting and Packing IDX/DAT Files
Open the app now, it will show a DOS menu with the options. I've put all three PSCCIcon executables inside. So this will work on all CC versions.
Open the folder where Photoshop is located, right click it the Photoshop.app and select Show Package Contents open the Contents folder then the Resources folder:
Photoshop.app/Contents/Resources/
Find the following files and copy them to your Desktop:
IconResources.idx
PSIconsHighRes.dat
PSIconsLowRes.dat
It is a good idea to make a backup of the original files.
Use the on screen menu to extract the IDX and DAT files. Edit the proper image for your resolution and save it. Then use the app again to pack it back into IDX and DAT.
Copy the modded files from where you back them up from.
Done! Now start Photoshop to see the modded splash.
To read the script's help — press h in the script's window.
{{ 'Comments (%count%)' | trans {count:count} }}
{{ 'Comments are closed.' | trans }}